Languages of Light: Analysis

Languages of Light: Analysis

(The following is the text from the submission I am required to make with my images for Assignment 4. It is a precis of other posts in my learning log which expand on these topics.)

While “beauty” is a subjective term, I have considered the statement by Mary Richardson, following her attack on the Rokeby Venus (From the Rokeby Venus to Fascism Pt 1: Why did suffragettes attack artworks?, s.d.)

Richardson is quoted as saying “Justice is an element of beauty as much as colour and outline on canvas”

I have extended this argument to concerns in contemporary society, where environmental issues should be prominent. Thus I have suggested “an artificial light source could only be considered to demonstrate “beauty” if it does not harm the environment”, either by using excessive and unnecessary energy, and/or contributing to light pollution. I have found this a difficult concept to incorporate into my images, but have attempted to do so.

Influences:

The influences I have consciously tried to incorporate into my work include those of Sally Mann and Rut Blees Luxemburg.

Sally Mann refers to “the refulgence or the reflection when light and water interact” (Rong and Mann, 2013), albeit with respect of images made in daylight. However this is also the case with artificial light. “Refulgence” incorporates the qualities of “splendour, brightness, radiance…shining with or reflecting, a brilliant light; radiant, resplendent, gleaming…”

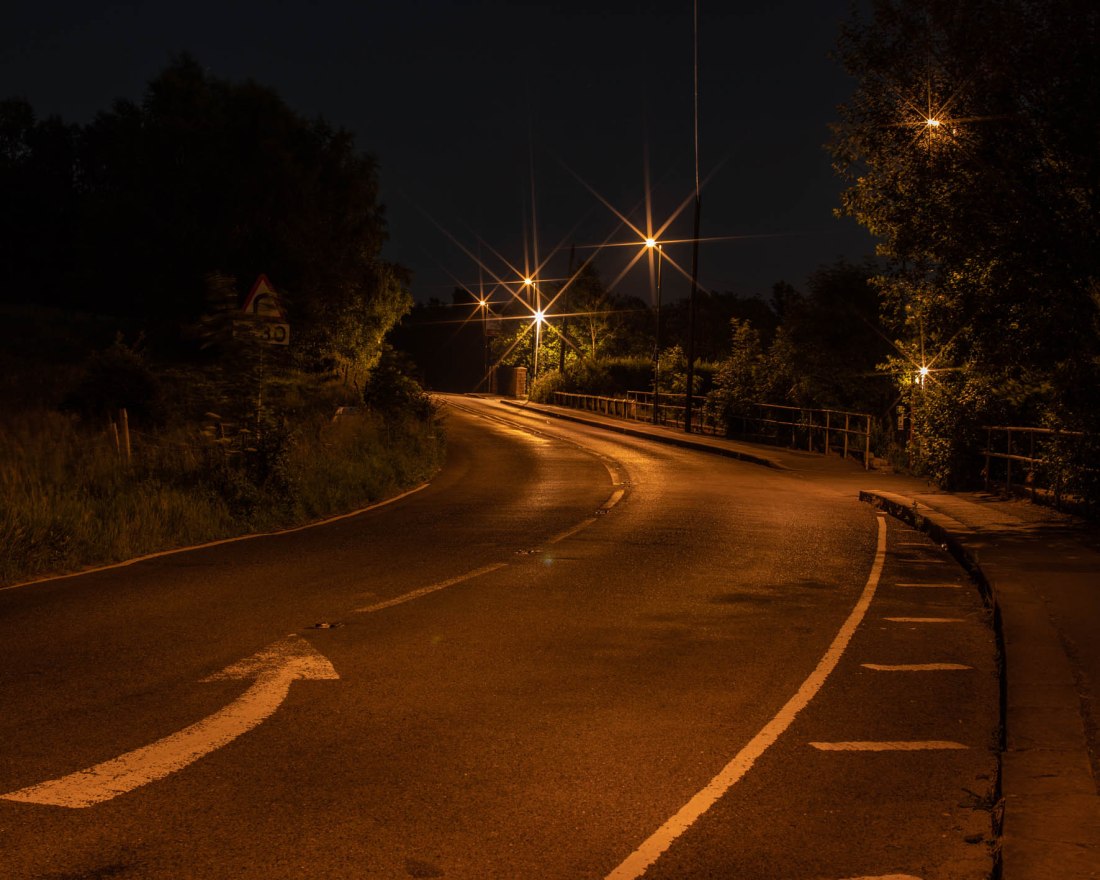
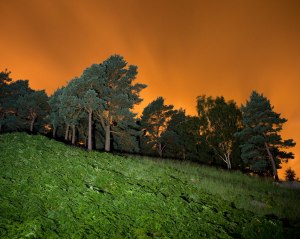
It is this quality of the light in Rut Blees Luxemburg’s series,”Liebeslied: My Suicides” (Luxemberg and Duttman, 2000) which I hoped to emulate. In addition, Rut Blees Luxemburg’s images of night-time London, have a distinctive colour palette, with a very marked orange overtone to many of the images which is different from how I perceive night-time scenes illuminated by street lighting. I aimed to try and establish the reason for this and to incorporate it into my images.

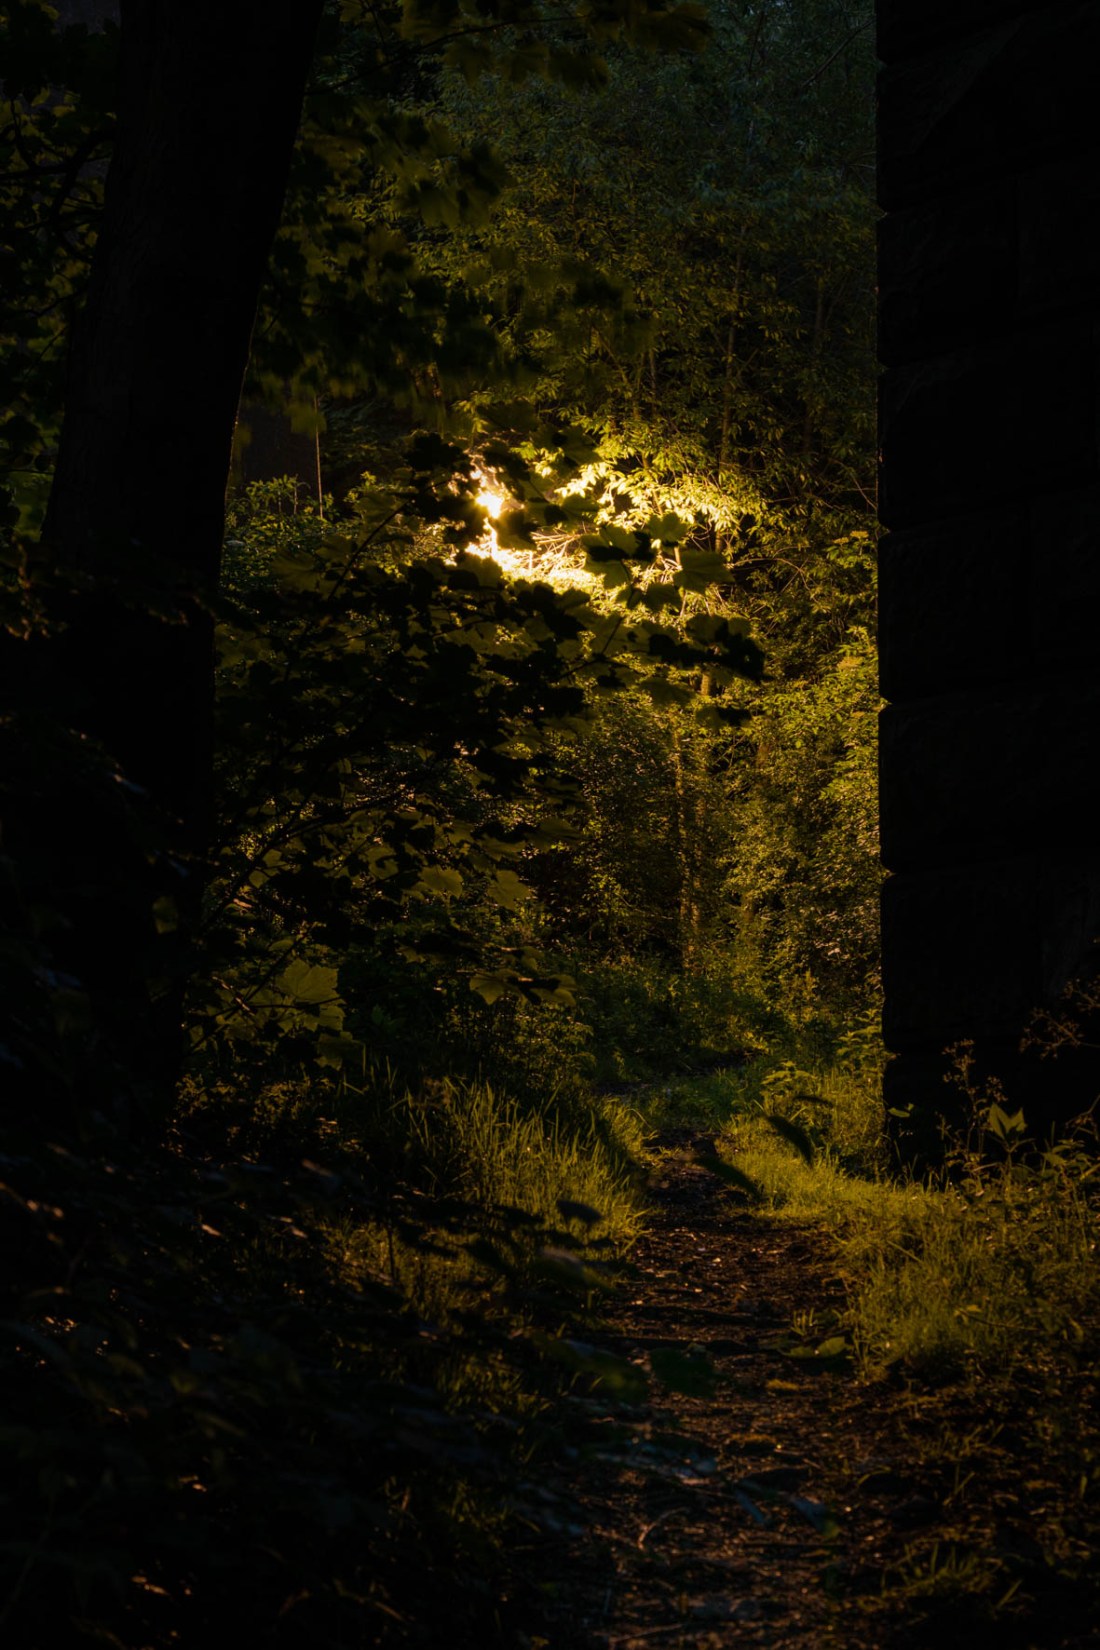
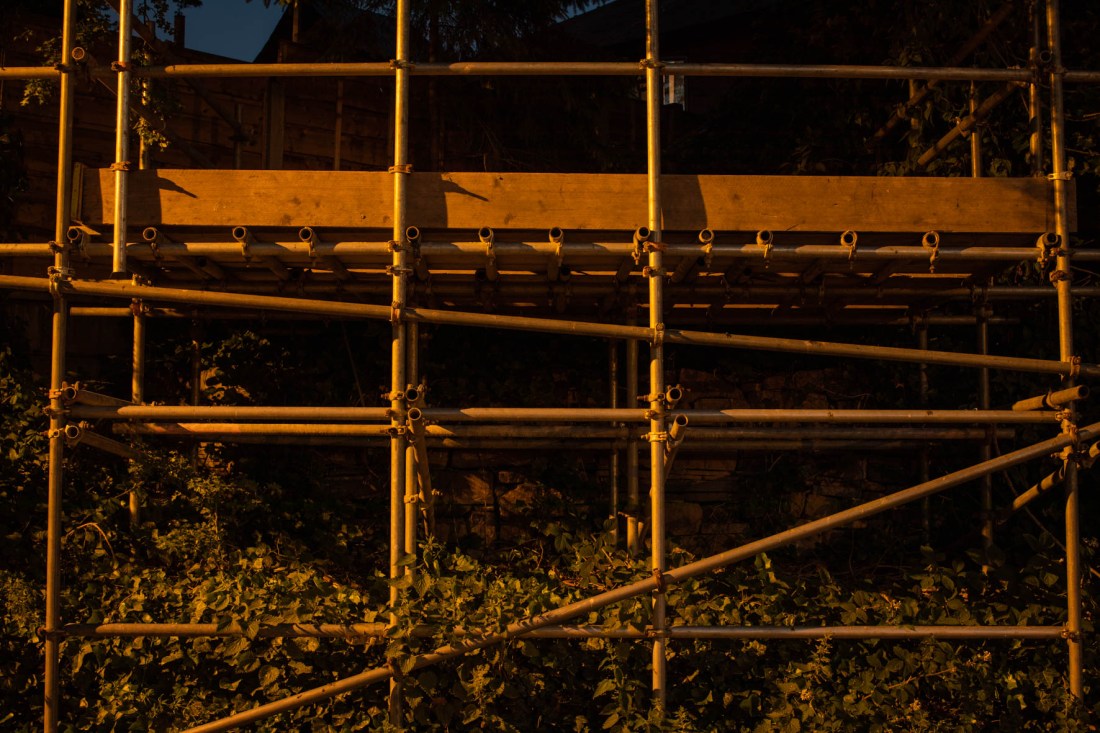
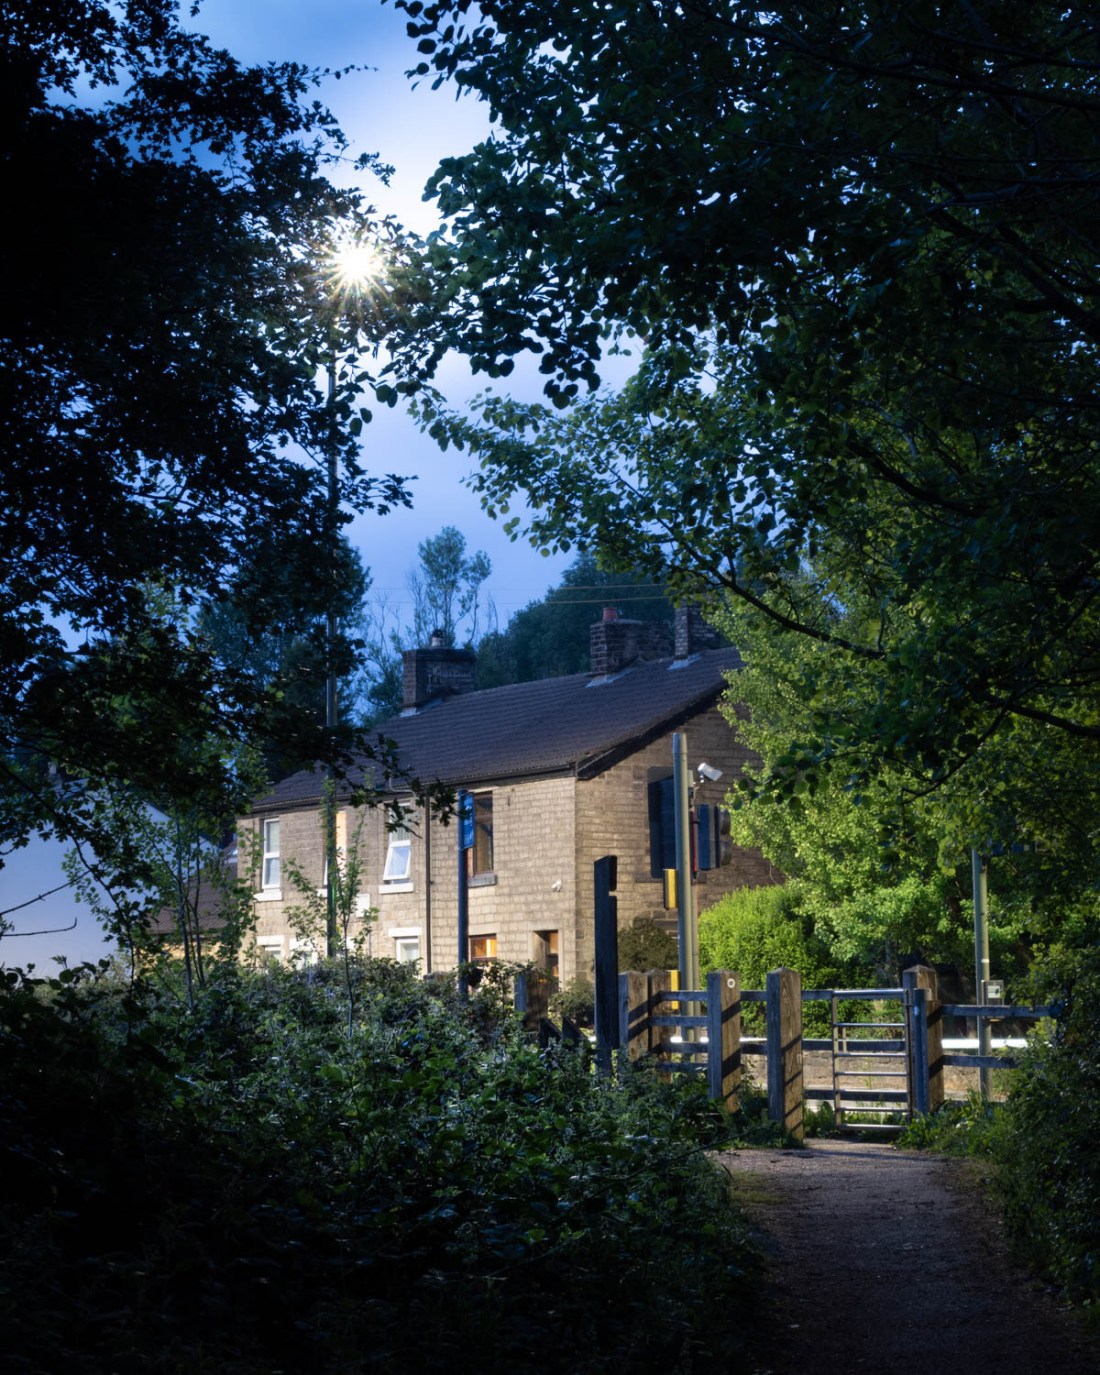
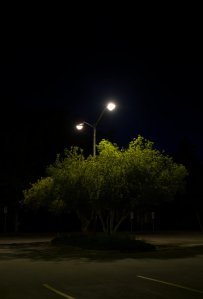
The work of Duncan Hill, in particular his series “Night Topographics”, includes images with a similar colour palette but also add a distinctive feeling of unease, very empty of day to day life expected in a scene during the day. Other images of trees illuminated by street lighting show the foliage in a different aspect. This is also the case for images made by Matthew Murray from his series, “Saddleworth” created by lighting “the landscape with artificial lighting, external lights, torches, car headlights” (Murray, 2017). I aimed to capture the unusual appearance of foliage when lit from unexpected directions.

I wanted to develop the assignment from the original exercise by

Better capturing “the beauty of artificial light” -particularly with regard to the construct of beauty I have suggested above

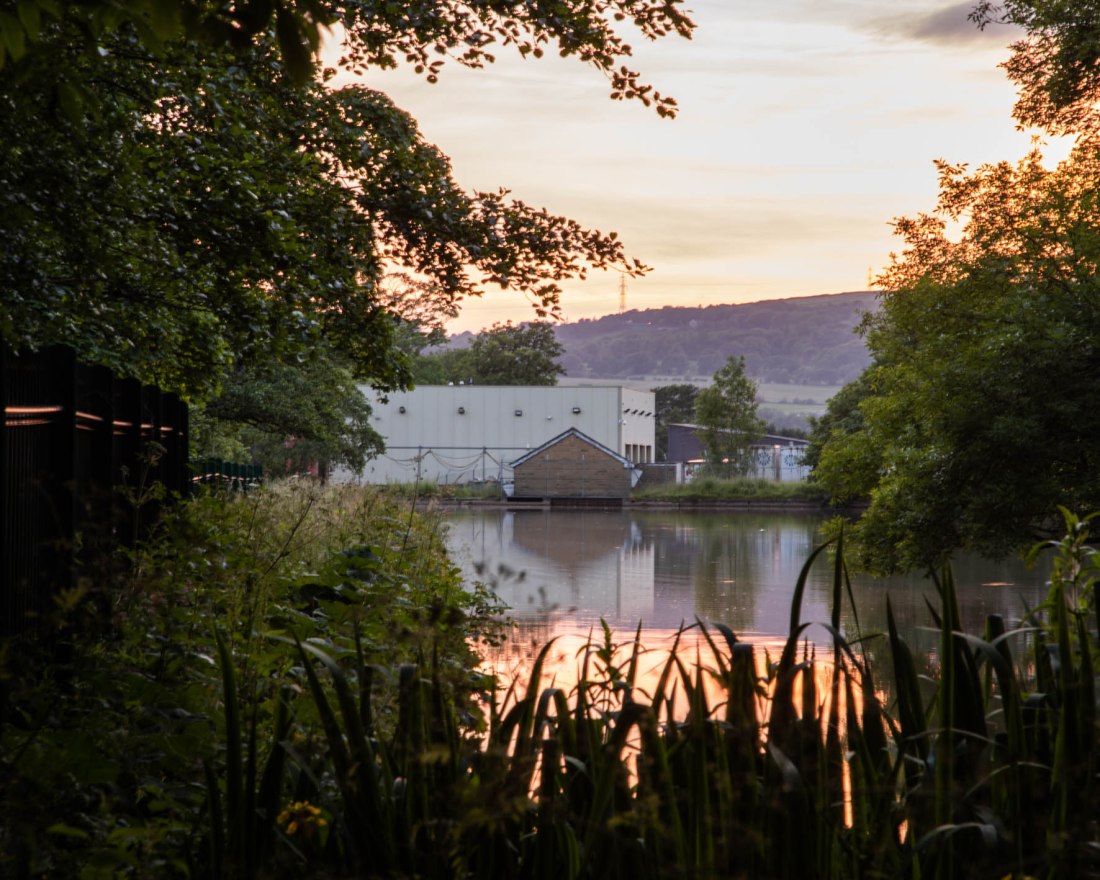
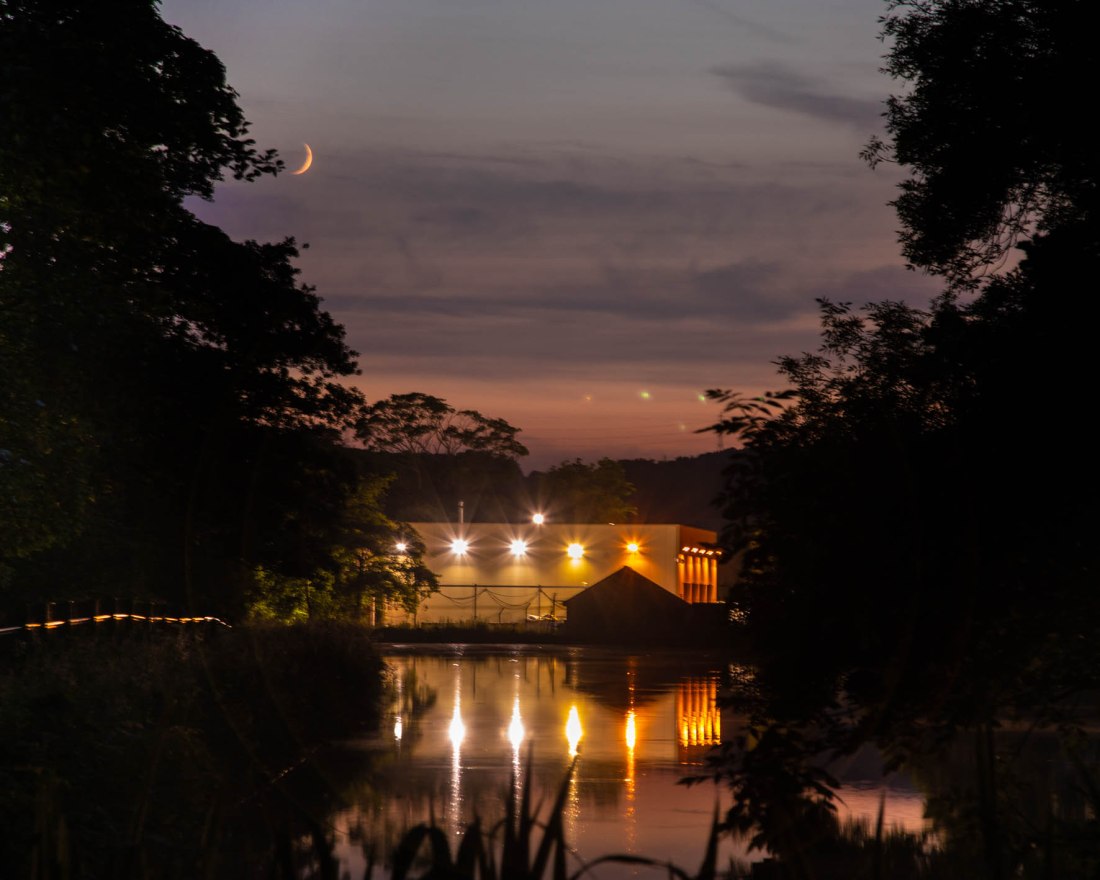
Capturing more of the interaction between the light and water, and the reflection of lights from different surfaces as it creates interesting patterns, unique to the night time

Overall, when I reviewed my exercise I realised many of the images were of artificial lights, not images made by artificial light. In many if not most of the images made by those photographers I cite, the actual light source is not seen… My overall aim is to make images using the artificial light to illuminate the scene.

Methods

I used a slow ISO value to obtain high-quality images which would most faithfully express the quality of light I was trying to capture, as a result of this long exposure times were necessary with a tripod.

I wanted to capture all the qualities of the light, including colour, so I used my digital camera as I am not equipped to use colour film at the present.

Colour Balance setting was a major consideration for my methodology. I had made all the images for Exercise 4.2 using “auto” setting for white balance. However some of the resulting images were somewhat disappointing as this setting tended to make the image look as if it had been made in daylight. I wanted to try and capture more about the quality of the artificial light and what it adds to the scene as it would otherwise be illuminated. I chose to use a custom white balance setting for my images. This involved setting the white balance for the light conditions after sunset, without any influence of artificial light. In this way, any “colour cast” would actually be the light that the artificial light had added to the scene.

Images were shot in RAW and edited in Lightroom. Adjustments were confined to cropping and local exposure adjustments. No changes were made to the coloration.

My Images


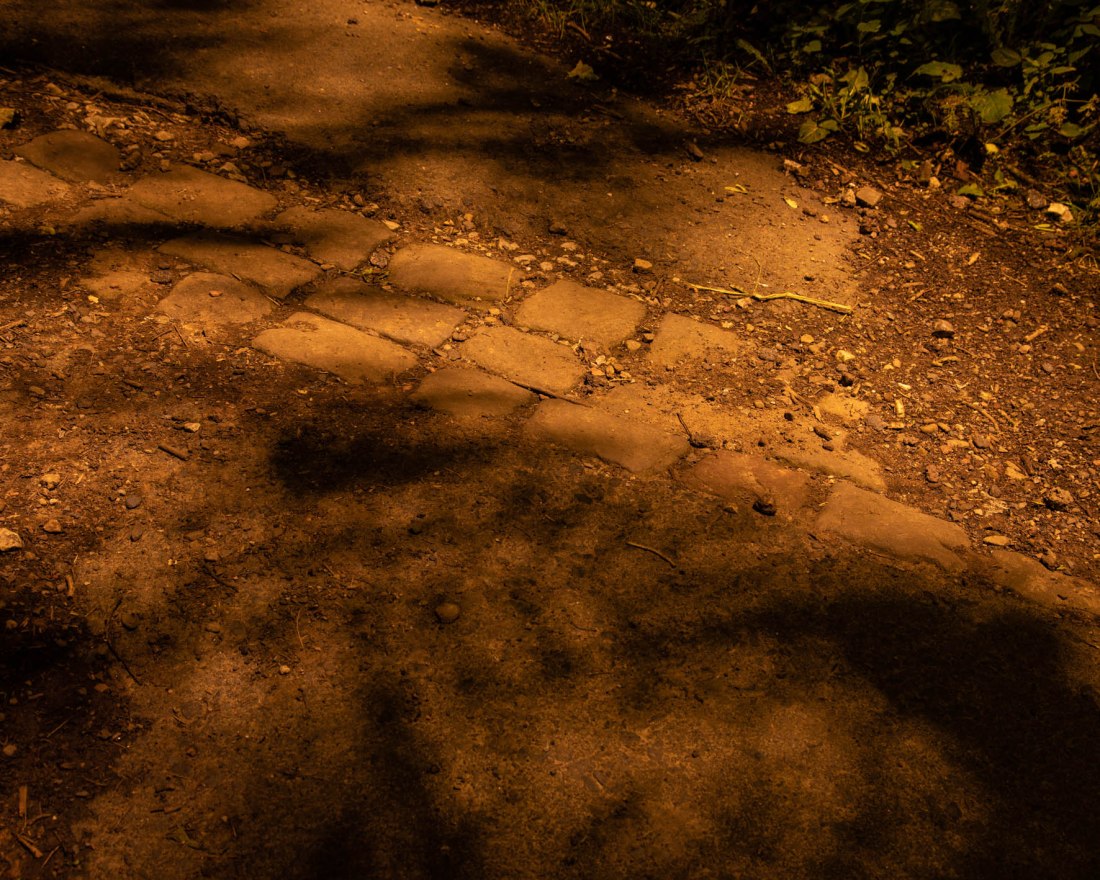
I noticed that LED Lights cast a distinctive shadow due to having several light sources together. These lights might be considered to demonstrate “beauty” by being more energy efficient than others.

Images EYV Ass 4-40, EYV Ass 4-41, EYV Ass 4-44, EYV Ass 4-46 and show different aspects of this patterning.

The interaction of light and water is shown in images EYV Ass 4-37 and EYV Ass 4-29. However the lit area at the visible end of the industrial site is a lorry wash, not in use at that time so it is difficult to justify these images meeting my criteria for beauty.

EYV Ass 4-4 shows the reflections of lights on parked cars.

The unusual appearance of foliage when lit from unexpected directions is shown in images EYV Ass 4-40 and EYV Ass 4-34.

Images EYV Ass 4-1, EYV Ass 4-6, and EYV Ass 4-2 are attempts to capture the feeling of being present at night when everywhere is quiet and deserted, and the light gives a different appearance to common scenes.

Making these images has involved a great deal of experimentation on my part, this was a new direction for me. I think that while I have had to use imagination to imagine what the scene would look like at night, I actually learned as I went along that the image my camera produced was distinct and differed from the daylight scene in ways I found difficult to predict at first. I am not sure how inventive I have been, these are all taken in the immediate vicinity of my home.

References

References to cited work is in my post “References” in my learning log at ap231photography.com

Assignment 4: Languages of light 3

Assignment 4: Languages of light 3

In this post I will describe the final images submitted, and the strengths and weaknesses of particular photographs and the project as a whole.

I made the images on shoots on two separate occasions. Contacts for the shoots are here.

Contacts 23 June 2020

Contacts 26 June 2020

Of these images I selected a number that I believe fulfil the ways I set to develop the assignment from Exercise 4.2.

These areas for development are:

“I do not think I have addressed “the beauty of artificial light” in these images”

LED street lights with many light sources in the array, gave a very distinctive pattern of shadows.

“I would like to try and capture more of the interaction between the light and water”

“the reflection of lights from different surfaces creates interesting patterns, unique to the night time”

These elements all relate to the idea of refulgence of the lights, which I would like to capture more.

The pools of different types of light on the ground here make patterns which could be the subject for further exploration”

This relates to this part of one of my images..

“…many of the images were of artificial lights, not images made by artificial light…

My overall aim is to make images using the artificial light to illuminate the scene.”


Patterns of shadows from LED Lights

I noticed this pattern of shadows from the foliage, seen in the foreground of this image.

2020-06-23 Glossop EYV Ass4-40
EYV Ass 4-40


This I have also shown in these taken nearby.

2020-06-23 Glossop EYV Ass4-44
EYV Ass 4-44
2020-06-23 Glossop EYV Ass4-46
EYV Ass 4-46


Interaction of Light and Water/Reflections

I identified this location and viewpoint which I thought would be enhanced by the artificial lights from the industrial buildings later in the evening. (This image is not part of my submission)

2020-06-23 Glossop EYV Ass4-10
EYV Ass 4-10


The final images I selected are these:

2020-06-23 Glossop EYV Ass4-37
EYV Ass 4-37
2020-06-23 Glossop EYV Ass4-29
EYV Ass 4-29

While these are striking images and might be considered to show a type of beauty, the brightly lit area at the visible end of the industrial site is a lorry wash, not in use at that time. In fact there was very little activity on the site during the time I was taking photographs, so it is difficult to justify these images meeting my own criteria for beauty, that an artificial light source could only be considered to demonstrate “beauty” if it does not harm the environment, either by using excessive and unnecessary energy, and/or contributing to light pollution”.

I also tried to capture the reflections of lights on parked cars, as I indicated in Exercise 4.2.

2020-06-25 Glossop EYV Ass4-4

EYV Ass 4-4


Using the artificial light to illuminate the scene

Developing the idea I had from the work of Duncan Hill, to look at how the lights illuminate foliage I made these images.

2020-06-23 Glossop EYV Ass4-40
EYV Ass 4-40
2020-06-23 Glossop EYV Ass4-34
EYV Ass 4-34


The other principle I saw from Duncan Hill is the feeling of being present at night when everywhere is quiet and deserted, and the light gives a different appearance to common scenes. These images try to capture that.

2020-06-25 Glossop EYV Ass4-2
EYV Ass4-2
2020-06-25 Glossop EYV Ass4-6
EYV Ass 4-6
2020-06-25 Glossop EYV Ass4-1
EYV Ass 4-1

The notes indicate I should evaluate my images against the criteria for creativity – imagination, experimentation, invention.

Making these images has involved a great deal of experimentation on my part, this was a new direction for me. I think that while I have had to use imagination to imagine what the scene would look like at night, I actually learned as I went along that the image my camera produced was distinct and differed from the daylight scene in ways I found difficult to predict at first. I am not sure how inventive I have been, these are all taken in the immediate vicinity of my home.


Assignment 4: Languages of light 2

Assignment 4: Languages of light 2

In this post I will describe my technical approach and the methods I have used.

Camera set-up

My experience with Exercise 4.2 I learned that I needed to use a slow ISO value to obtain high-quality images which would most faithfully express the quality of light I was trying to capture – ie the refulgence, the brightness and radiance of the light and its reflections. As a result of this long exposure times were necessary with a tripod.

I wanted to capture all the qualities of the light, including colour, so this necessitated my using my digital camera as I am not equipped to use colour film at the present. A second consideration is that the digital camera provides a more immediate feedback and allows me to assess the exposure immediately.

Images were made with a Canon EOS 5D Mk4 and either a 24-105mm zoom lens or 50mm f1.2 prime.I selected apertures of between f8 and f16 to enable a deep depth of field as this seemed appropriate for the compositions I was aiming for.

Exposures were made according to the camera metering, set to centre-weighted average, and then adjusted if needed.

Colour Balance

This was a major consideration for my methodology.

I had made all the images for Exercise 4.2 using “auto” setting for white balance. However some of the resulting images were somewhat disappointing as this setting tended to make the image look as if it had been made in daylight.

An example of this is.

2020-06-03 OCA Ex4-2-13
2020-06-03 OCA Ex4.2 #13 ISO125, f/11 30.0sec

Here the foliage and buildings appear just as they might do in the daylight even though it was made about one hour after sunset. I felt that this setting of my camera failed to capture the experience of viewing the scene at night with artificial light.

Although I am fairly familiar with the principles of white balance, in particular from experience of taking photographs by ambient light underwater, I revised my knowledge by referring to a recommended textbook (Diprose and Robins, 2012).

Visible light is part of the spectrum of electromagnetic radiation which encompasses what we know as radio waves, microwaves, infra-red radiation, ultra-violet radiation, X-rays and gamma rays. It just happens that through evolution our eyes are sensitive only to electromagnetic radiation of wavelengths in a restricted range, “visible light”. Within that range, we perceive different wavelengths as being of different colours. While the wavelengths of light can vary continuously, we perceive the colours as distinct and discrete, due to the way the light receptors in our eyes are constructed. There is nothing inherently “red” about electromagnetic radiation which we perceive as red light, it is rather that it triggers responses from light sensitive cells which are interpreted by us as red.

White light is composed of all wavelengths of electromagnetic radiation in the visible range, but different light sources have different combinations of these. So when there is a preponderance of longer wavelengths (ie reds and orange) we see this as a “warm” light. Conversely when there is a preponderance of blue and violet wavelengths this seems a “cool” light. This is referred to as “colour temperature”, which in turn relates to a theoretical black object radiating light as it is heated, we are familiar with the idea of heating a piece of metal which starts to glow red and as it gets hotter, brighter.

As photographers we have to take photographs in various types of light. “Daylight” might be the light of a clear blue sky, dominated by short wavelength blue light – so is considered a cool light. Conversely, around sunset and sunrise the light has more red and orange (due to passing a longer distance through the atmosphere, which filters out the blue wavelengths). Rather confusingly the “cool” light of the blue sky would be assigned a colour temperature around 10000K, a hotter temperature than the “warm” light of sunset which would be of the order of 5000K.

Artificial light sources also have this range of colour temperatures. So that an incandescent household bulb will have a warm light (≈3000K), while fluorescent tubes may be cooler (of the order of 5000K).

We do not always perceive this difference. Our eyes and brain adjust to the light source, and we tend not to notice the difference unless the light sources of different temperatures are adjacent to each other. Our cameras however do not make this adjustment and show the light source as it is, and as a result colours may not appear how we perceive them.

The white balance correction allows us to adjust for this; either by specifying a colour temperature or picking a pre-set corresponding to a type of light. Once that is set, white objects appear white, without a colour cast corresponding to the type of light.

An alternative is the Auto White Balance setting. The Canon website (V and Canon Europe Ltd 2002-, s.d.) describes this. “ Auto White Balance works by evaluating the scene and deciding the most appropriate white point in it. The setting works reasonably well if the colour temperature of the ambient light is between 3,000-7,000K. However, if there is an abundance of one colour in the image, or if there is no actual white for the meter to use as a reference, the system can be fooled, resulting in an image with a colour cast.

For Exercise 4.2, I used Auto White Balance. While this did not result in a colour cast, some of the resulting images did not reflect the appearance of the scene as I saw it. One example of this is this image which looks like it has been taken during the day, rather than an hour after sunset.

I wanted to try and capture more about the quality of the artificial light and what it adds to the scene as it would otherwise be illuminated. I chose to use a custom white balance setting for my images. This involved setting the white balance for the light conditions after sunset, without any influence of artificial light. In this way, any “colour cast” would actually be the light that the artificial light had added to the scene.

Post-processing

Images were shot in RAW and edited in Lightroom. Adjustments were confined to cropping and local exposure adjustments. No changes were made to the coloration.


References

References to the works cited in this post are found in my separate post “References”


Assignment 4: Languages of light 1

Assignment 4: Languages of light 1

Brief

“Revisit one of the exercises on daylight, artificial light or controlled light from Part Four (Ex 4.1, Ex 4.2 or Ex 4.3) and develop it into a formal assignment submission. The submission requirement for this assignment is a set of between six and ten high-quality photographic prints.”

The brief also requires I include an analysis of the work outlining:

  • how you have developed the assignment from the original exercise in Part 4
  • which practitioners you’ve looked at for inspiration and how their work has influenced you
  • your technical approach and any particular techniques you incorporated
  • the strengths and weaknesses of particular photographs and your project as a whole (self-assessment)

In this post I will address the first two points (how I have developed the assignment from the original exercise and which practitioners I have looked at for inspiration and how their work has influenced my submission).

I will address the other points in later posts describing the methods used and the images submitted.

Prior to starting this element of the course I posted some initial thoughts about this assignment.

“My initial thoughts on this are that I will probably choose to do the “Daylight” or “Artificial Light” exercises as my Assignment submission as I have already developed a studio-lit sequence for my submission for Assignment 2. This is a learning experience and I think I will learn more if I use a different technique for this assignment.”

Having now completed the exercises in this part of the course I have decided to revise the “Exercise 4.2: Artificial Light” as my assignment. This is largely because I have found that exercise the most challenging of the three.

I have previously completed an assignment using studio lighting, and developed the exercise 4.3 into a submission for Exercise 5.2: Homage. I am most familiar with working in daylight, but found the technical challenges of working by ambient artificial light more challenging. Also, I found it more difficult to predict what the image would look like after a long exposure, as it did not always resemble my perception of the scene. I have discussed this more later with reference to the methods and technical aspects of the project.

In myaccount of my work for Exercise 4.2, I refer to a number of themes which have influenced my and my approach to the exercise and assignment. I will summarise these and refer back to my earlier accounts.

My Interpretation of Beauty in Relation to Artificial Light

While it is the case that “beauty” is, as the course notes suggest, a subjective term, I have considered this in the light of the statement by Mary Richardson, following her attack on the Rokeby Venus (From the Rokeby Venus to Fascism Pt 1: Why did suffragettes attack artworks?, s.d.)

Richardson is quoted as saying “I have tried to destroy the picture of the most beautiful woman in mythological history as a protest against the Government destroying Mrs Pankhurst, who is the most beautiful character in modern history. Justice is an element of beauty as much as colour and outline on canvas”

I have extended this argument to concerns in contemporary society, where environmental issues should be prominent. Thus I have suggested “an artificial light source could only be considered to demonstrate “beauty” if it does not harm the environment”, either by using excessive and unnecessary energy, and/or contributing to light pollution. I have found this a difficult concept to incorporate into my images, but will attempt to do so.

Artists and Photographers as Influences

In my initial account of my approach to the Exercise 4.2, I described the work of the artists referred to in the course notes.

Of these the influences I have consciously tried to incorporate into my work include those of Sally Mann and Rut Blees Luxemburg.

Sally Mann refers to “the refulgence or the reflection when light and water interact” (Rong and Mann, 2013), albeit with respect of images made in daylight. However this is also the case also the case with artificial light.

I was unfamiliar with the term “refulgence”, however the Shorter Oxford English Dictionary (Little et al., 1973) defines this

Refulgence “The quality of being refulgent, splendour, brightness, radiance…”

Refulgent “Shining with or reflecting, a brilliant light; radiant, resplendent, gleaming…”

It is this quality of the light in Rut Blees Luxemburg’s series,”Liebeslied: My Suicides”(Luxemberg and Duttman, 2000) which I hoped to emulate.

In addition, Rut Blees Luxemburg’s images of night-time London, have a distinctive colour palette, with a very marked orange overtone to many of the images. This is illustrated by images such as these

One of the consequences of this is that the final image has a colour range which is different from how I perceive night-time scenes illuminated by street lighting. I set out to try and establish the reason for this and to incorporate it into my images.

In addition, my tutor referred me to the work of Duncan Hill, in particular his series “Night Topographics”, such as this

Rua De Sao Antoninho, Estremoz
Rua De Sao Antoninho, Estremoz; Duncan Hill


This image has a similar colour palette to those of Rut Blees Luxemburg. However, it also adds a distinctive feeling of unease, as large parts of the scene are hidden in darkness. It also appears very empty of the day to day life as might be expected of a road junction during the day. This encapsulates to me a feeling of what it is like to be out late at night/early morning before the town gets going.

Duncan Hill also has images of trees illuminated by street lighting; these show the foliage in a different aspect.


They remind me of the images I saw made by Matthew Murray from his series, “Saddleworth” made by lighting “the landscape with artificial lighting, external lights, torches, car headlights” (Murray, 2017).

I hoped to capture the unusual appearance of foliage when lit from unexpected directions.


Development from the original exercise in Part 4

I have already suggested ways in which I would like to develop the exercise. These include:

I do not think I have addressed “the beauty of artificial light” in these images”

I find it hard to work out how to address this – in the event I found that LED street lights with many light sources in the array, gave a very distinctive pattern of shadows. I will discuss how I think I address this in my analysis.

“I would like to try and capture more of the interaction between the light and water”

“the reflection of lights from different surfaces creates interesting patterns, unique to the night time”

These elements all relate to the idea of refulgence of the lights, which I would like to capture more.

The pools of different types of light on the ground here make patterns which could be the subject for further exploration”

This relates to this part of one of my images..

Overall, when I reviewed my exercise I realised many of the images were of artificial lights, not images made by artificial light. In many if not most of the images made by those photographers I cite, the actual light source is not seen… My overall aim is to make images using the artificial light to illuminate the scene.

References

References to the works cited in this post are found in my separate post “References”


Review of My Objectives: 24 June 2020

Review of My Objectives: 24 June 2020


My over-arching objective now is to re-establish an effective, regular pattern of working in order to be able to complete the course with a view to submission for assessment in November 2020.

I have been able to work steadily to the timetable and interim deadlines which I drew up. To date I am on track for submitting my next assignment to my tutor the coming weekend, having completed my images. I am therefore on track to complete the course within the framework I have set.

I have not identified any new objectives in the last two weeks other than the work arising from completing the exercises and assignments.

Objectives Identified Previously

Skills:

Film Photography

I have posted digital images for Exercise 4.4, but at the same time I shot film which I plan to develop and print. However I have not had the time to do this in order to keep to the deadlines I have set. However I have been working on some of the exercises from Part 5 (in advance of my timetable), so anticipate having time in the next short while to do this film work as I intended.

Better documentation of the technical elements.

I am making a conscious effort to take detailed records of technical parameters of my film work and other settings where these are not recorded in the metadata of the digital images..

Use of Web-based and other Electronic Learning Tools

Use of other Work Sharing Websites (eg Padlet)

I have not used the EYV padlet but we have a discussion planned soon about the use of the OCA North Group Padlet. We had a hangout meeting last night about it.

Engagement with Electronic Web-based learning events

In the last two weeks I have not joined any new events as I have been working on my practical exercises. This continues.

Assessment and appraisal skills

This remains ongoing task and other than my research and assessing my own work; one aim of the OCA North Padlet is to help with this.

New Skills needed:

Studio Lighting

I have used this in my exercise and also completed some images for Ex 5.2 Homage using studio lighting (in response to the lighting in Weston’s “Pepper No. 30”). I am more confident with this, but it remains an ongoing aim.


Knowledge:

My objective was to gain a better understanding of other art disciplines and influence on photographic work. The feedback I have from my tutor is that I am “starting to connect other art forms to your method and approach to research”. However, this remains an ongoing learning objective.

To gain an insight into more contemporary and historical approaches to photography

I have not looked at any other artists than those referred to in the notes in the last two weeks, but have the plan to research photographers I have been directed to by my tutor, for the next assignment.

Studio Lighting

Better theoretical knowledge remains a goal.


Attitudes:

My objective was the “Demonstration of creativity – Imagination, experimentation, invention”

This remains an objective and I hope with better understanding of the creative process used by other artists I will develop this more.

Exercise 4.4: Personal Voice

Exercise 4.4: Personal Voice

Brief

“Make a Google Images search for ‘landscape’, ‘portrait’, or any ordinary subject such as ‘apple’ or ‘sunset’. Add a screengrab of a representative page to your learning log and note down the similarities you find between the images.

Now take a number of your own photographs of the same subject, paying special attention to the ‘Creativity’ criteria at the end of Part One…

Add a final image to your learning log, together with a selection of preparatory shots. In your notes describe how your photograph or representation differs from your Google Images source images of the same subject.”

The course notes for this exercise indicate that one of the aims of this exercise is to demonstrate a personal response and willingness to experiment. The example subject discussed is different approaches to photographing Mount Fuji.

I have looked at the portfolio, “Mount Fuji” by Chris Steele-Perkins. He comments on the portfolio that:

The work considers the place of Mount Fuji, the iconic symbol of Japan, in our modern times, and references the works of the great Japanese artists, Hokusai Katsushika and Utagawa Hiroshige, whose series of woodblocks, 36 Views of Mount Fuji, were a record and commentary on Mt Fuji in relation to the society of their times; the early to mid 1800′s. The images were constructed in a way that Fuji was ever-present, ‘observing’ the landscape and society around it, a discipline I have continued.”

This idea of Fuji “observing” in an ever present way is apparent in Hokusai’s image “Below Meguro”. When seen against this image by Hokusai, Steele-Perkins’ image “Preparing Rice Fields near Gotemba” makes complete sense with the present day farmers going about their business, not paying attention to the iconic mountain in the background, in the same way as the farmers in Hokusai’s print.

The notes also refer to the approach by John Davies in his series “Fuji City”. My reading about the work of Davies indicates that a substantial body of his work has involved documenting the industrial and post-industrial landscape of Britain. Against this background, his series Fuji City, begins to have a different meaning, in which again Mt Fuji, is a backdrop to the industrial landscape.

Davies is quoted on his website as being “not so much interested in entertaining an audience or providing vehicles for escape but in delivering a highly crafted detailed image conveying a sense of reality. A reality that shares a recognition of aspects of urban living. But importantly, making images of a landscape that attempts to question our acceptance and perception of the inevitable consequences of living in a post imperialist society and within a post industrial landscape”.

In his series “Green and Pleasant Land”, Davies made images of the landscapes in the immediate vicinity of my home and of locations which I have photographed. This includes this image of Dinting Vale, taken close to my house, from the viaduct I photographed in this image.


Dinting Vale
Dinting Vale, John Davies

I thought that Davies’ images in this series are documentary in their representation of the industrial and urban landscape. They are depictions of the landscape, and as such differ from the depiction of the human experience of living in these environments such as those I have shown in this blog from photographers such as Don McCullin and Ian MacDonald.

My Approach to the Brief

I have chosen “Peak District Landscapes” as my broad category for this exercise.

A Google search for images using this term results in these images and many similar.

Peak District Landscapes
Sample images from Google search for “Peak District Landscapes”

These images all show a very rural image, generally without any buildings, or, if they are present, exclusively farm buildings. The landscape is of the moorland, with vibrant colours of the vegetation. Almost all the images include examples of the gritstone outcrops which are common and a hallmark of this landscape. That rocky outcrop, may be replaced in the image by millstones, produced from that millstone grit.

These images to me seem to be created with the intention of “entertaining an audience or providing vehicles for escape(Davies, s.d.) In terms of what I have so far understood about aesthetic codes, all these images appear to represent pictorialism. The lighting is dramatic and the colours intense. While they capture some aspects of the rural Peak District, to me they only show one aspect.

The Peak District has been a managed landscape for hundreds of years. The land has supported agriculture and mining, and in the last couple of centuries, grouse shooting. Since the industrial revolution, the moorlands of the High Peak have been very close to large centres of population and industry. Perhaps because of this latter point, it has been the site of high profile events to gain better access to open spaces, away from the industrial cities. In particular the Kinder Mass Trespass, is generally considered to have been the first of a series of actions leading to the foundation of the UK National Parks and the Countryside and Rights of Way Act of 2000 (Wikipedia contributors, 2020).

My approach to this exercise is to try and show the Peak District landscape from the perspective of those living in the industrial centres who would aspire to spend time on the adjacent moorlands.

I have tried to create landscape style images. Rather than have the moors used as a backdrop, “ever-present, ‘observing’ the landscape and society around (them)(Chris Steele-Perkins; Mount Fuji, s.d.), I wanted to create an image more like the industrial landscapes of John Davies.

Method

I have used a digital SLR for these images, but also used a medium format film camera to capture the similar scenes in monochrome with film. Those images will be the subject of a later post.

My digital contact sheets are at:

Ex 4-4 Contacts

From these I have selected these which I think show how the moors encircle the now post-industrial town. As such they perhaps do not encapsulate the contrast between the working environment and the rural open space.

2020-06-22 Glossop-7
2020-06-22 Glossop#7
2020-06-22 Glossop-10
2020-06-22 Glossop#10
2020-06-22 Glossop-13
2020-06-22 Glossop#13

Closer to that aim are these with modern industrial units in the foreground.

2020-06-22 Glossop-25
2020-06-22 Glossop#25
2020-06-22 Glossop-24-2
2020-06-22 Glossop#24


Overall I think the images go some way to what I was aiming for. However, in retrospect it may have been more effective to have gone into the town and had the moors in the distance, more like Steele-Perkins has positioned Fuji in his images. However the images do share a style and expansive viewpoint in common with the images of “Peak District Landscapes” I found on the Google search.

References

References to the works cited in this post are found in my separate post “References”


Exercise 4.3: Egg or stone – Shoot 2

Exercise 4.3: Egg or stone, Shoot 2

I conducted a second shoot using the same equipment and set-up as Shoot 1, with the intention of exploring the effect of colour a little more. I used two speedlights at angles either side of the object, and modified the colour of each with green, red, yellow and blue gels.

The change to the settings I made for these images was to set the camera to custom white balance and adjust that for an image of white card illuminated by both flashes. (The card can be seen in the contacts. The contacts for the shoot are at:

Ex 4-3 Contacts #2

Results: Shoot #2 13/06/2020

With the custom white balance set, the object illuminated by two flashes without gels shows its “natural” colours.

2020-06-13 Ex 4-3-204
Ex 4.3 #204

I attempted to mix a white light with a blue and yellow light, using a yellow gel on one, and a blue gel on the other.

Separately these lights give this effect:

And together, there is a blue shadow to the right, and yellow shadow to the left. The central part of the object, where the lights overlap, is not quite as when shot is a white light, but is more like that than either alone.

2020-06-13 Ex 4-3-211
Ex 4.3 #211

The other image which I think is worth reproducing here is a similar arrangement with green and red light. The contrast between the colours here emphasises the texture of the stone and to me, does add a further dimension to characterising the roughness and granularity.

2020-06-13 Ex 4-3-229
Ex 4.3 #229


Next steps

Having read the notes for the course and for the later exercises, I am aware that Exercise 5.2 – “Homage” requires me to “Select an image by any photographer of your choice and take a photograph in response to it”.

I have already described the image “Pepper No 30” by Edward Weston found the lighting in this very unusual, rendering the pepper an abstract aspect.

Pepper No 30

Pepper No. 30, Edward Weston (1930)

I have used the set I have built and the lighting arrangements to photograph a series of peppers in response to Weston’s image and will develop these to form the basis of my images for  exercise 5.2.


Exercise 4.3: Egg or stone – Shoot 1

Exercise 4.3: Egg or stone, Shoot 1

Brief:

“Use a combination of quality, contrast, direction and colour to light an object in order to reveal its form. …

The important thing is to aim for four or five unique shots – either change the viewpoint, the subject or the lighting for each shot.

Add the sequence to your learning log. Draw a simple lighting diagram for each of your shots showing the position of the camera, the subject and the direction of the key light and fill.”


Methods

Object:

The object I chose to photograph was a rounded stone, about 120mm along its longest dimension. This stone is from a stream bed on the hills locally and is of the local gritstone. I chose this as the coarse texture of the stone has significance in its previous use for making mill-stones (“Millstone Grit”). In addition the gritstone edges of this area of the Pennines was the site of origin of an expansion in rock-climbing in the UK in the 1950’s. The texture of the rock led to particular style and techniques. It is this texture which I hope to explore in the images.

Equipment

Set: I began by creating a set on which to photograph my object. I have used a background of dark grey paper with a curve to manage the “horizon line” as suggested in the course notes. The positioning of the set allowed me to arrange the lighting around the object. As shown in these images.

Camera etc:

Camera – Canon EOS 5D Mk4

Lens – 100mm macro

Flash – 2 x Nissin Speedlights with radio control and various modifiers including softboxes (700mmx700mm and 200mmx150mm)

Settings:

Manual setting for camera in all shots

Manual control of flash for all shots

ISO 100

Auto white balance for the first series (altered later to custom white balance)

Post-processing

Images were shot in RAW and processed in Lightroom. The only manipulation was cropping to a square format.


Technique

The technique adopted is to have a camera setting which results in a black image by the ambient light, without flash. In this way I can then increase the intensity of the flash to create the image and have complete control of the light sources producing the image.

The first series of images I took were all with one camera position with a lens to object distance 400mm


Results:

Shoot #1 12/06/2020

Contacts for this shoot are at:

Ex 4-3 Contacts #1

Quality and Contrast

To try and create a very soft light from large light sources, I used two flashes at either side of the object both fitted with softboxes. The following is from my notebook made at the time:

This resulted in an image in which the visible part of the stone is almost uniformly illuminated. The coarse texture of the stone is apparent only because of the alteration in colouration. The overall shape of the stone is not apparent as there is very little shading of any part of it.

2020-06-12 Ex 4-3-22
Ex 4.3 #22

Removing the softbox from the flash to the right of the object (as viewed from the camera position) results in a stronger shadow to the left side and the left side of the stone is now in shadow.

However the right side of the stone lacks more detail and seems harshly lit.

2020-06-12 Ex 4-3-25
Ex 4.3 #25

Removing both soft boxes now causes the object to cast a hard shadow with well demarcated edges on the background to both sides.

2020-06-12 Ex 4-3-27
Ex 4.3 #27

When only one light without softbox is used to the left of the object a hard deep shadow is cast to the right. This hard shadow is also seen on the surface of the object, throwing the granulations into stark contrast. (Image 30). With the same position of lighting and adding the large softbox, the sharpness of these shadows is reduced (Image 28) and detail in the shaded side of the stone can be seen.

Direction

Putting one of the lights directly over the object causes a different appearance, with the main shadow falling below the object and the granulations of the surface being less clearly defined.

2020-06-12 Ex 4-3-45
Ex 4.3 #45

The light was directed to a restricted area of the subject and this enhanced the demarcation from the background.

2020-06-12 Ex 4-3-35
Ex 4.3 #35

Colour

In all these images I have set the white balance to “Auto White Balance”. I made a few images putting coloured gels in front of the flash, but realised this may be a mistake, as the white balance setting will aim to correct a colour cast and adjust the entire image to an average as if illuminated by white light.

I will repeat this exercise with a custom white balance.

However, the images I did create just show a colour cast to the object – although adding a magenta gel to the flash to the right, does create a colour contrast between the sides of the object.

2020-06-12 Ex 4-3-50
Ex 4.3 #50

While this is an interesting effect, I am not sure it adds anything to my understanding of the stone.

Project 3 Ex nihilo

Project 3 Ex nihilo

This project is about the use of studio lighting and the course notes refer to four aspects of lighting under the control of the photographer:

  • Quality
  • Contrast
  • Direction
  • Colour

The notes elaborate on some of this.

Quality

“at its most basic it can be described as the simple distinction between hard and soft light

This is defined as whether the light casts hard or soft shadows, and in turn is controlled by the size of the light source relative to the subject.

I have thought a little about this and the diagrams below help me understand how this is. A small point light source is hidden from a large area behind the object – the shadow and the margins of the shadow are well demarcated. However a large light source, like a softbox casts a light across its entire length. Thus there will be an area of the shadow which is illuminated by increasingly greater amount of the light source, and the edge of the shadow area is therefore diffuse.

The notes refer me to the work of Jean-Baptiste Huynh. On his website (Jean Baptiste Huynh – Site officiel, s.d.) are examples of images created in the studio, illuminated by soft lighting. He has applied this technique to a range of subjects – plants, insects, parts of the body, nudes and portraiture. He also uses colour and monochrome for this.

In my reading about studio lighting for still life, I used a recommended textbook (Diprose and Robins, 2012), which in turn referred me to the work of Edward Weston and in particular his image Pepper No. 30. This image was apparently lit by placing it in a metal funnel, ((Weston and Newhall, 1961) as cited in (Wikipedia contributors, 2019)). It is this technique which results in the characteristic lighting effect.

Pepper No 30
Pepper No. 30, Edward Weston (1930)

The other artist referred to in the course notes is Irving Penn. The notes refer to his work illuminated by the light of a skylight only. Briefly researching his work I have learned that he was noted as one of Vogue magazine’s top photographers. His biography on website of The Irving Penn Foundation (The Irving Penn Foundation, s.d.) indicates that he developed a preference for “photographing in the controlled environment of a studio” although this was not for the management of the lighting but “where he could trim away anything that was not essential to his compositions and hone in on his subjects”.

That website also refers to him in 1950 photographing the haute couture collections in Paris for Vogue. Then he “worked in a daylight studio with an old theater curtain as a backdrop”. One of the images from that time is this one, presumably shot by daylight.

Harlequin dress - Model Lisa Fonssagrives, Irving Penn 1950
Harlequin dress (Model Lisa Fonssagrives); Irving Penn 1950

However I note that the model’s face is very evenly lit, in spite of being under the brim of a large hat. Creating an even lighting in those conditions with a light source from one direction presumably has required the use of extensive reflectors.

The other aspects of the lighting the notes suggest I consider are

Contrast

This is the difference in illumination between the shadows and highlights and depends on variable lighting to illuminate the shadows.

Direction

The direction of the light determines the direction of the shadows and this can significantly alter the appearance of the subject.

Colour

The colour of the light can be altered – either directly or by the use of coloured reflectors. I have previously referred to a workshop I did on the use of speedlights for studio lighting. In this I used coloured light sources to alter the background for the subject. This is an example.

2017-01-29 Jessops-138
Speedlight Workshop #138

My plan for the next exercise is to build on that workshop and do the exercise with speedlight flashes, reflectors and coloured gels. In this way I should be able to alter the four parameters suggested.


References

References to the works cited in this post are found in my separate post “References”


Review of My Objectives: 10 June 2020

Review of My Objectives: 10 June 2020

In my last review I considered that “My over-arching objective now is to re-establish an effective, regular pattern of working in order to be able to complete the course with a view to submission for assessment in November 2020.

To achieve this I have made a number of innovations.

These include that I have read the course notes in detail for those elements which I still need to complete. Based on this, I have drawn up a timetable with interim deadlines for myself for completing each exercise. That is in addition to having deadlines for submission to my tutor of the two remaining assignments.

Objectives Identified Previously:

Skills:

Film Photography

My current plan is that I will complete Exercises 4.1, 4.2 and 4.3 using a digital camera so as to have colour images and can explore the effect of that on the images. However Exercise 4.4: Personal Voice, does lend itself to completion using film so I will be resuming work in this medium shortly.

Better documentation of the technical elements.

I will be incorporating this into my work with film cameras and have included technical data into my presentations of the exercises with digital cameras..

Use of Web-based and other Electronic Learning Tools:

Development of Learning Logs and Information systems

I have set up a Paperfile account and am adding new research references to this. I have also started using Google Docs, rather than Word for drafts of my blog posts. I have found that this is a much more efficient method as I can not only incorporate the reference and citations, but can then import the post with formatting into WordPress very easily.

Overall I am now happy with the structure of my learning log, and think I have a very effective way of creating posts appropriately and easily. Going forward I will be using this and do not see any need to have this as an area for development, but just to maintain what I am doing.

Use of other Work Sharing Websites (eg Padlet)

I have identified I need to visit the EYV Padlet regularly and use the materials there, contribute to discussions and share my work as appropriate. I have been looking at this, but not as yet contributed to the discussions or shared work.

Engagement with Electronic Web-based learning events

I have attended OCA web-talks but as yet not joined in any other electronic learning experiences, either from the OCA/UCA or other organisations.

Assessment and appraisal skills

This remains ongoing task and other than my research and assessing my own work, I have not had opportunities to do more of this.

New Skills needed:

Studio Lighting

Project 3 Ex nihilo, involves the use of studio-type lighting. This is not a technique which I commonly use. Although I have in the past attended a workshop on lighting, and used studio lighting (with Speedlights) for Assignment 3, I think this is an area for further work, to not only develop my skills, but also gain a theoretical knowledge of how different artists have used controlled lighting to achieve certain effects.


Knowledge:

My objective was to gain a better understanding of other art disciplines and influence on photographic work. The feedback I have from my tutor is that I am “starting to connect other art forms to your method and approach to research”. However, this remains an ongoing learning objective.

To gain an insight into more contemporary and historical approaches to photography

This is another ongoing objective, and I have done little since my last review of my objectives. However the feedback from my tutor is to concentrate on more contemporary practitioners.

Studio Lighting

Better theoretical knowledge of this is needed (see above)


Attitudes:

My objective was the “Demonstration of creativity – Imagination, experimentation, invention”

This remains an objective and I hope with better understanding of the creative process used by other artists I will develop this more.